 You are in: home > musician-stories > daniel
3. Making the change
The chin rest
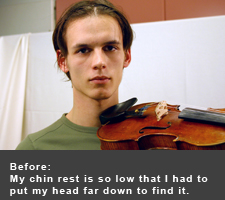
To find a good chin rest for me was a challenge because I was very attached to the shape of my original model. At the beginning I tried to use the centred chin rests in the testing kit we used in the research, but I didn't like the position of the chin rest on the violin. With my original chin rest I could play with the violin right in front of me or a little bit to the left, since it had a double cup: two places that I could put my chin. But the problem with my old chin rest was that it was too low; my chin had to go down so far to find the violin that my neck got very tense. I knew that if I wanted to improve my sound I needed my neck to be freer.
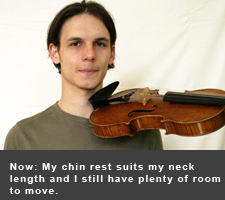
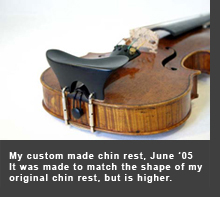
So we decided to alter my original chin rest by putting corks under the feet, trying to find the right height to allow my neck to be free. We started with short corks and over some weeks increased the height. After a few months I had a cork of height 9 mm under the right leg of the chin rest and one of 8 mm under the left leg, which also tilted the chin rest a bit making it more comfortable. I decided to stop for a time at this height because I was starting to feel "addicted" to the changes and I felt my violin was getting far away from my face and I was used to having it near, since it is "mon second amour." In the end, the carpenter made me a chin rest copied from the shape of my original chin rest but much higher. This felt the best and I am still using it now a year later.
When I first changed my chin rest, I felt a bit like I had on a neck brace, the kind you wear after a car accident. My neck muscles were so used to shortening that after the change I got a headache at the back of my head when playing, because I kept on pressing down even when I did not have to. At the beginning also I felt more tired when I was playing, so I needed a little more time to practice. This was because my muscles were tense when they tried to play in the new way. Now I have no trouble playing with a chin rest that is even higher than the one I started with, but back then it was a lot to get used to.
I also found that I could then play with my shoulders and neck a little more open with the violin higher. I could keep my left hand and arm higher. This came partly from my Alexander Technique lessons and also from the new equipment.
The shoulder rest
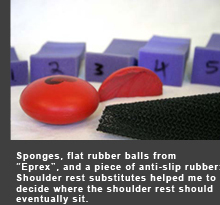
With a re-adjusted chin rest, my old shoulder rest no longer worked for me. To try and find out what I needed, we experimented with playing with different materials in place of the shoulder rest. At first I used special rubber balls and a piece of anti-slip rubber, but the violin moved around too much. In the middle of the research the teacher brought from USA a new model that I liked a lot. For a while this felt fine, but this shoulder rest was quite large and it dampened the sound of my violin, so in the end I switched to another model. (See photos on first page.)
The group
The process of improving equipment and playing better was helped a lot by being in a group of students all working on the same things. It was good to find out that we all had the same problems. Later I was sometimes unsure because everyone came up with different solutions and I became indecisive about what to try. Seeing people having problems makes you a bit scared. At the same time the group helped me. Because when other people have the same problems, we can try to find common solutions.
Alexander Technique
The Alexander lessons helped me get used to the new equipment. In the group lessons we worked with our bodies to discover where the violinist usually has tension. In the private lessons the teachers worked with me to try to remove existing tension and to teach me how to be more relaxed when playing and in my daily life.
Because I slowly freed up my muscles, it became possible to get a good adjustment of my chin rest and shoulder rest, and to find the best position for the violin.